At a basic level, scanning is pretty straightforward. You feed a piece of paper into one end of the device and you end up with an electronic copy of what’s on the page. The type of scanner you use and how you configure the settings determine the speed at which you can process pages and the resulting quality of that copy.
Speed is governed by several factors, the first of which is the hardware itself. If the manual says that the scanner can process 30 pages per minute, then that is the fastest it can go if all other settings are optimized for speed. (If it were a car, road conditions would have to be perfect in order for the driver to get the MPG rating claimed on the dealer sticker.) If you are regularly scanning the back sides of pages, too, consider investing in a scanner that will process both sides simultaneously with one pass through the scanner. Regardless, since scanning speed is also tied to image quality, you may not end up getting the speed that the manual claims. The higher the image quality you want, the fewer pages the scanner will process in a minute as it focuses more closely on each page. And there is another cost of increased page focus: larger file size.
The quality controls that have the highest impact on speed, image quality, and file size are image file format, dots per inch (DPI), and color versus black and white. Your goal is to obtain the best quality image you can at a speed and file size you can live with. Depending on what you are scanning and how you intend to use the images, this could mean different settings.
Image File Format
For instance, the most commonly used image file formats for web pages are GIF, PNG, and JPEG. GIF is best used for simple graphics, resulting in a smaller file when nuances like shading aren’t critical to the overall image. Although JPEGs are larger files, they are also generally the best bang for the buck when it comes to photographic type images, providing superior quality at a given file size. For text, you may prefer to use TIFF or PDF to maximize compatibility with other image manipulation applications such as optical character recognition (OCR) and ECM repositories.
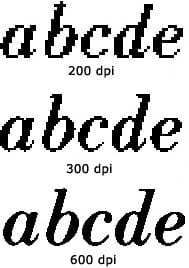
The easiest way to explain DPI is in terms of its effect on how you see the image. The higher the DPI, the more clean and smooth edges appear on the screen as in the example to the right. As you would expect, a higher DPI also means a larger file size. Finding the right setting for your documents is a bit of an art. If you are unsure about where to start, try 300 DPI for black and white scanning or 150 DPI for color.
Color versus Black/White
Some colors do not translate well when scanned in as black and white images. Blues tend to disappear, reds turn black, and certain shades of colored paper can result in an image that’s just a big, black rectangle. If you don’t need the colors that drop out and the ones that come in darker aren’t blocking critical information that is visible on the original page, then scanning in black and white will generally process pages more quickly and result in a smaller file size.
These days, however, when I say black and white what I really mean is grayscale. True black and white, also known as bitonal, means the page is made up of only pure white and pure black pixels. This mode is a disaster if you have pages with coffee stains, watermarked logos, colored inks or on colored paper, but it can work very well for straight text documents in good condition. Bitonal files take up very little room on disk compared to grayscale or color because they only have to worry about about two colors.
Image Cleanup
Depending on your scanning software’s processing options, there may be additional settings available to do some image cleanup during the scanning process if your original image is not in the best condition. These options could include:
- Border Removal
- Deshade
- Deskew
- Despeckle
- Edge Enhancement
- Streak Removal
- Line Removal
- Endorser
- Color dropout
Software cleanup can only go so far, however. If you try to scan in a document that is illegible, it’s not going to magically be legible after scanning no matter what processing options you throw at it. In short: garbage in, garbage out.
What are the optimal settings you have found for the types of documents you scan? Let us know in the comments.


